Key functions
Lorem Ipsum is simply dummy text of the printing and typesetting industry. Lorem Ipsum has been the industry’s standard dummy text ever since the 1500s, when an unknown printer took a galley of type and scrambled it to make a type specimen book. It has survived not only five centuries, but also the leap into electronic typesetting, remaining essentially unchanged. It was popularised in the 1960s with the release of Letraset sheets containing Lorem Ipsum passages, and more recently with desktop publishing software like Aldus PageMaker including versions of Lorem Ipsum.
Key concepts
Lorem Ipsum is simply dummy text of the printing and typesetting industry. Lorem Ipsum has been the industry’s standard dummy text ever since the 1500s, when an unknown printer took a galley of type and scrambled it to make a type specimen book. It has survived not only five centuries, but also the leap into electronic typesetting, remaining essentially unchanged. It was popularised in the 1960s with the release of Letraset sheets containing Lorem Ipsum passages, and more recently with desktop publishing software like Aldus PageMaker including versions of Lorem Ipsum.
Lorem Ipsum is simply dummy text of the printing and typesetting industry. Lorem Ipsum has been the industry’s standard dummy text ever since the 1500s, when an unknown printer took a galley of type and scrambled it to make a type specimen book. It has survived not only five centuries, but also the leap into electronic typesetting, remaining essentially unchanged. It was popularised in the 1960s with the release of Letraset sheets containing Lorem Ipsum passages, and more recently with desktop publishing software like Aldus PageMaker including versions of Lorem Ipsum.
Architechture
Lorem Ipsum is simply dummy text of the printing and typesetting industry. Lorem Ipsum has been the industry’s standard dummy text ever since the 1500s, when an unknown printer took a galley of type and scrambled it to make a type specimen book. It has survived not only five centuries, but also the leap into electronic typesetting, remaining essentially unchanged. It was popularised in the 1960s with the release of Letraset sheets containing Lorem Ipsum passages, and more recently with desktop publishing software like Aldus PageMaker including versions of Lorem Ipsum.
Lorem Ipsum is simply dummy text of the printing and typesetting industry. Lorem Ipsum has been the industry’s standard dummy text ever since the 1500s, when an unknown printer took a galley of type and scrambled it to make a type specimen book. It has survived not only five centuries, but also the leap into electronic typesetting, remaining essentially unchanged. It was popularised in the 1960s with the release of Letraset sheets containing Lorem Ipsum passages, and more recently with desktop publishing software like Aldus PageMaker including versions of Lorem Ipsum.
About this Release
Lorem Ipsum is simply dummy text of the printing and typesetting industry. Lorem Ipsum has been the industry’s standard dummy text ever since the 1500s, when an unknown printer took a galley of type and scrambled it to make a type specimen book. It has survived not only five centuries, but also the leap into electronic typesetting, remaining essentially unchanged. It was popularised in the 1960s with the release of Letraset sheets containing Lorem Ipsum passages, and more recently with desktop publishing software like Aldus PageMaker including versions of Lorem Ipsum.
Lorem Ipsum is simply dummy text of the printing and typesetting industry. Lorem Ipsum has been the industry’s standard dummy text ever since the 1500s, when an unknown printer took a galley of type and scrambled it to make a type specimen book. It has survived not only five centuries, but also the leap into electronic typesetting, remaining essentially unchanged. It was popularised in the 1960s with the release of Letraset sheets containing Lorem Ipsum passages, and more recently with desktop publishing software like Aldus PageMaker including versions of Lorem Ipsum.
In this Article
I. Introductions
1.1. Purposes
This document provides information and instructions regarding the configuration requirements prior to utilizing the Consent Management system.
1.2. Target Audiences
This document is intended for unit managers and individuals utilizing the Consent management system.
II. Instructions
2.1. Access URLs
- User Interface: https://ob-consent.savyint.com/consent
- Administrator Interface: https://ob-consent.savyint.com/admin
2.2. Security Configuration
- Two-Factor Authentication with OTP
- Login with 2FA


**Note: Users may configure additional security settings, including OTP authentication when logging in from a new device, and adding recovery phone numbers and email addresses.
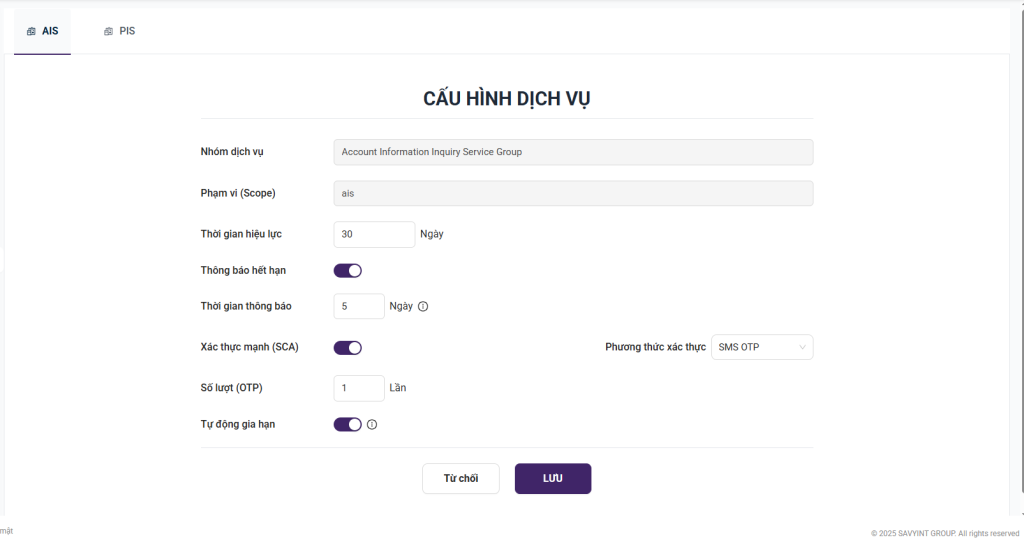
2.3. Services Configuration (AIS / PIS)
- Navigate to the Admin Page and select “Service Configuration” from the menu on the left side of the Dashboard
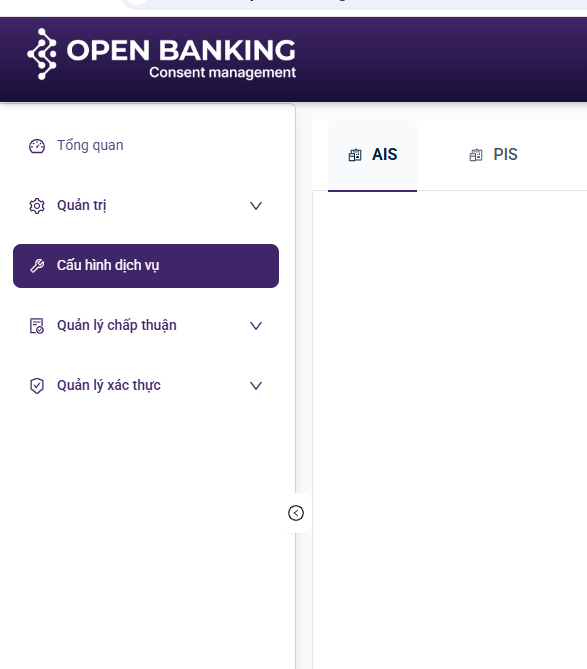
- The screen displays the service configuration interface for AIS and PIS, enabling the configuration of service groups, scopes (AIS, PIS), consent session validity periods, expiration notification settings, and support for strong customer authentication parameters..
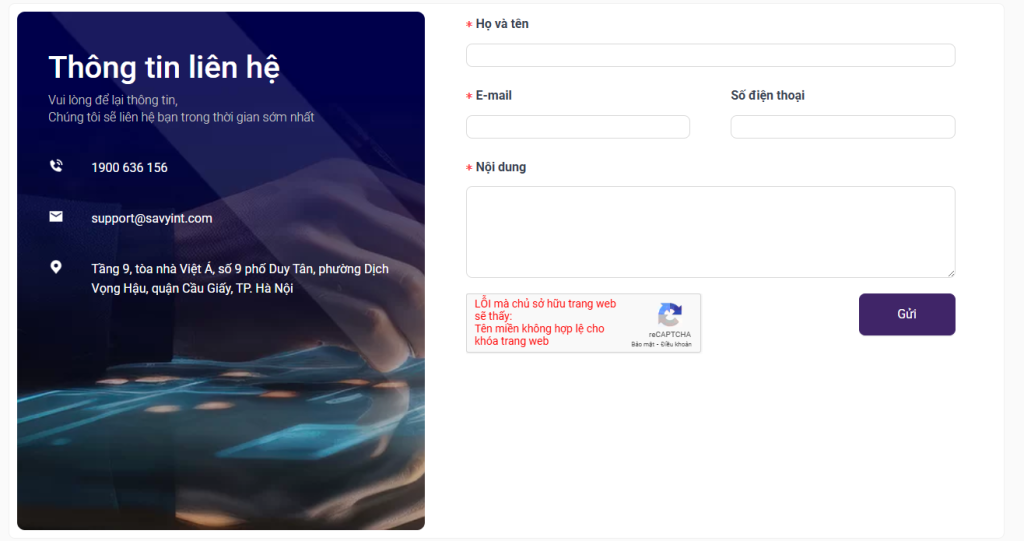
2.4. Contact Information Configuration
2.5. Administrator Configuration
- Upon registering for the Consent Management system via an organizational account, you will be provisioned with an administrator account featuring designated access privileges. This account is essential for data initialization and the management of information pertaining to the internal organization.
- URLs: https://ob-consent.savyint.com/admin
2.5.1. Account List
- Select add new internal account
- View detailed information or update account data
- Add users with specific assigned permissions
- Delete or lock accounts

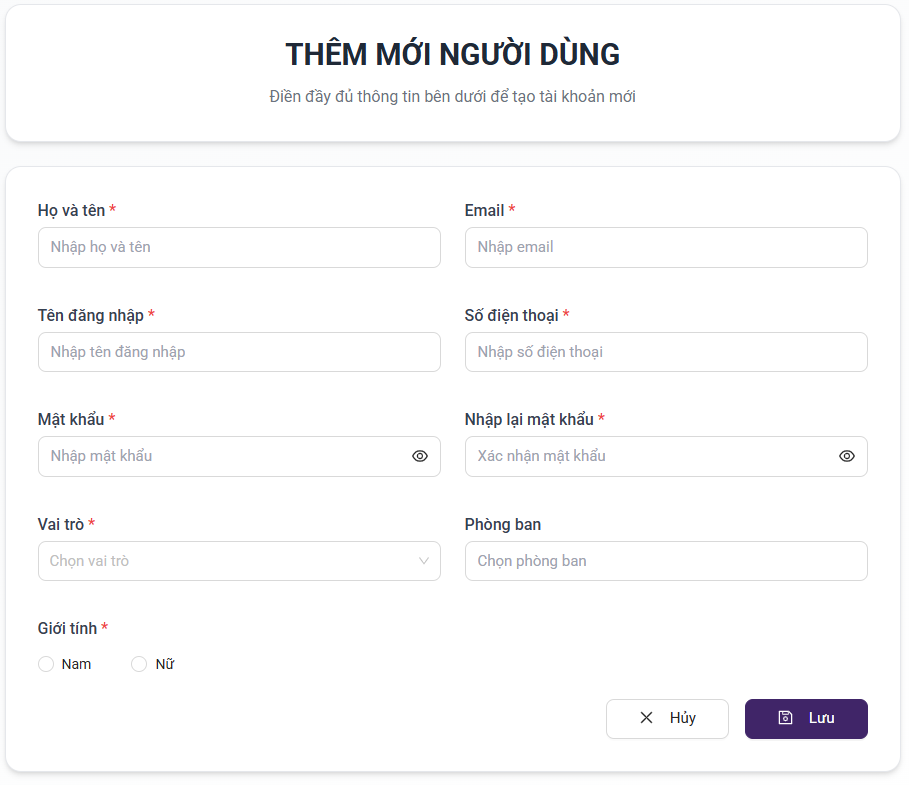
2.5.2. Adding New Account
- Enter account information
- The entered Username shall serve as the login credential for the consent administrator
- Configure the specific permissions assigned to the account
- Select save
- Enable searching and filtering of existing permissions
- Enable adding new user within the organization
- View detailed user information
- Displays basic information regarding roles and permissions, and facilitates the assignment of users to specific permissions

- Enter data into the required information fields
- Add new user
- Select save
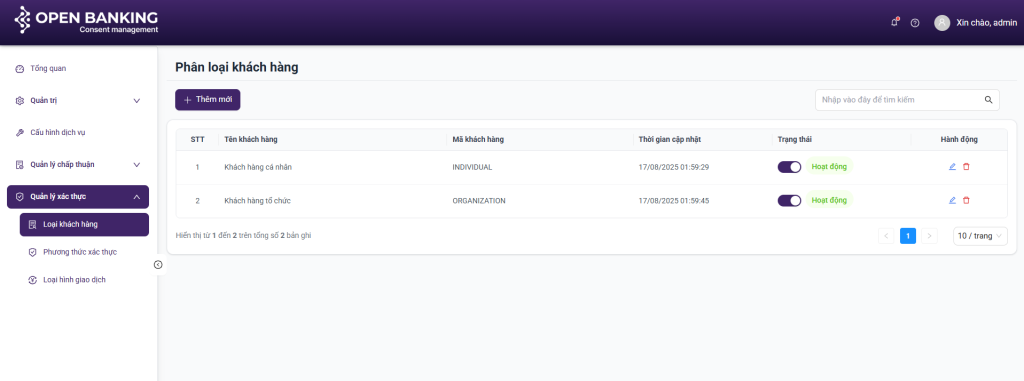
2.6. Customer Type Configuration
Purpose: to enable the configuration of specific customer categories, including Individual clients and corporate clients of the bank
- Enables the filtering and searching of the bank’s customer categories
- Enables viewing of detailed information
- Add new, delete, and edit operations
Configuration of adding a new type of customer: input the customer name, customer code, and the description
Click the Save button to record the customer type information

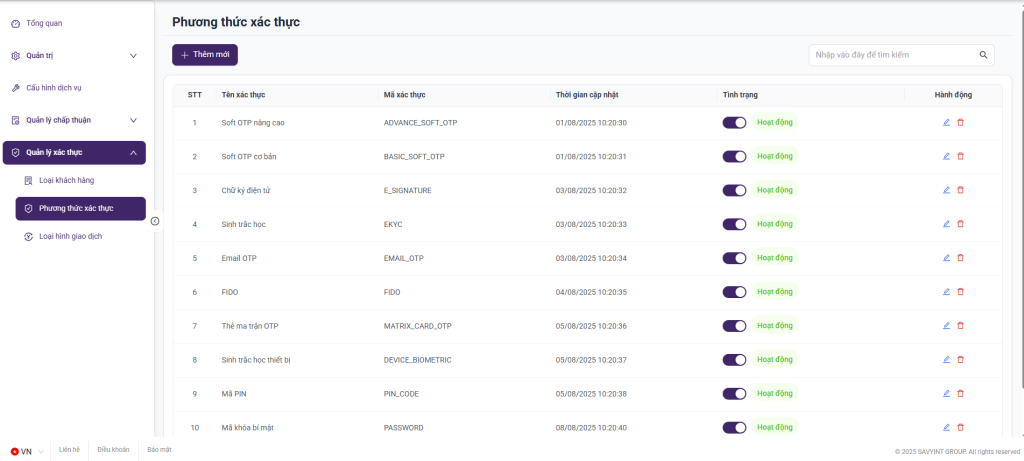
2.7. Authentication Method Configuration
Purpose:
- This function enables the system to manage and configure Authentication Methods applicable to specific transaction types, ensuring compliance with Circular 50/2018/TT-NHNN regarding safety and security in electronic transactions stipulated by the State Bank of Vietnam (SBV).
- The system allows for the declaration, configuration, and management of various authentication methods, such as: SMS OTP, Email OTP, Soft Token, Hard Token, Biometrics (fingerprint, facial recognition), or Multi-Factor Authentication (MFA). Each authentication method can be associated with specific transaction types, depending on the risk level and the organization’s security policies.
The system supports the following administrative functions:
- Add new authentication method types
- Update or configure detailed parameters for each method (example: OTP validity period, code length, transmission/reception mechanism, authentication channel, etc.)
- Search and view the list of all existing authentication method
- View detailed information of each authentication method
- Revoke or disable authentication methods when no longer in use or due to suspected security risks
- Log configuration history to facilitate future auditing and traceability
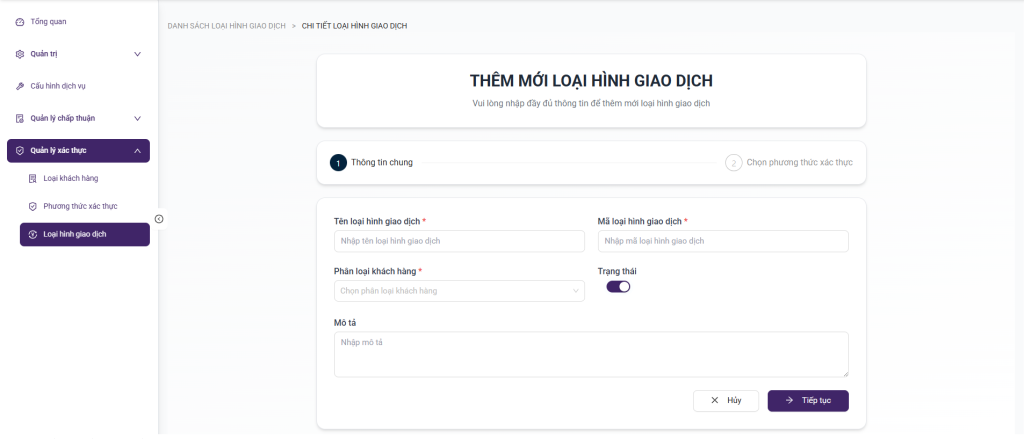
2.8. Transaction Type Configuration
Purpose:
- This function enables the system to declare, manage, and configure electronic transaction types within the organization’s scope of operations. It ensures the application of appropriate authentication measures in accordance with Circular 50/2018/TT-NHNN regarding safety and security in the provision of online banking services.
The system allows for the definition and classification of transaction types based on various criteria, for example:
- Inquiry Transaction
- Payment / Transfer Transaction
- Maintenance Transaction
- High-risk Transaction
Each transaction type is configured with the following basic attributes:
- Transaction Type Code – unique identifier within the system
- Transaction Name – A concise description of the business function
- Risk Level – determines the necessary security level (low, medium, high)
- Scope of Application – services, channels, or customer segments authorized for use
- Requesting authentication method – linked to the authentication methods defined
- Validity Period / Operational Status – allows enabling/disabling or limiting validity according to policy
In this Article
I. Purposes
The “Savyint Consent Management (SCM) – User Guide” provides a detailed description and step-by-step instructions for administrative users regarding the operation and utilization of the SCM product, covering the following key functions:
1. Login
2. Dashboard
3. User Management
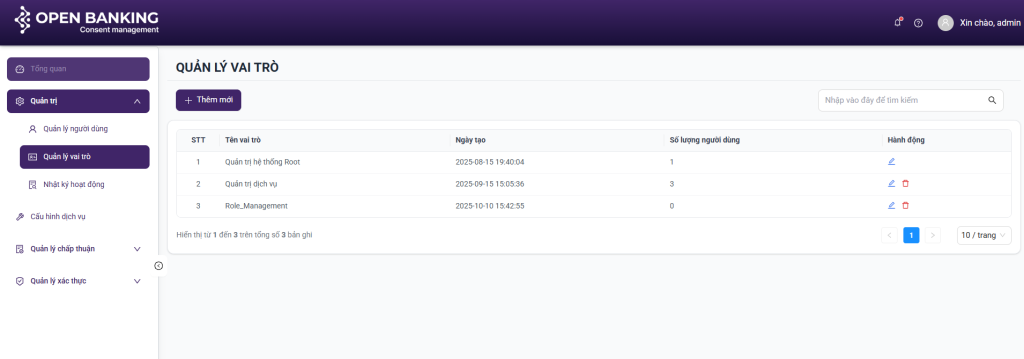
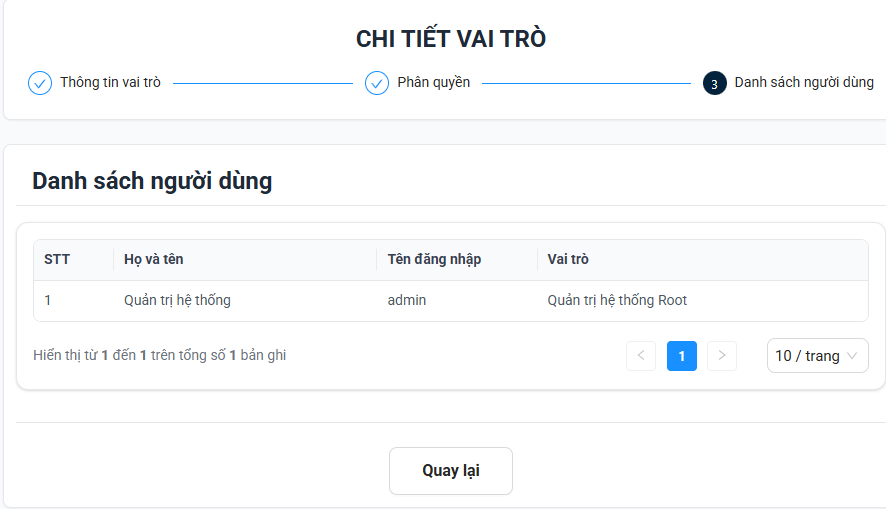
4. Role Management
5. Action Logs
6. System Configuration
7. Consent Session Management (AIS, PIS)
8. PIS Consent Authentication Management
II. Execution of User Authentication Flows
II.1. Redirect Flow
Purpose: To describe the procedural steps for executing the user data sharing or payment confirmation flow
Step 1: Initiate the data sharing flow within the TPP application
Step 2: Select the relevant bank information
Step 3: The user logs in to the bank’s authentication system
Step 4: The user selects the account and confirms data sharing (AIS) or executes the payment (PIS)
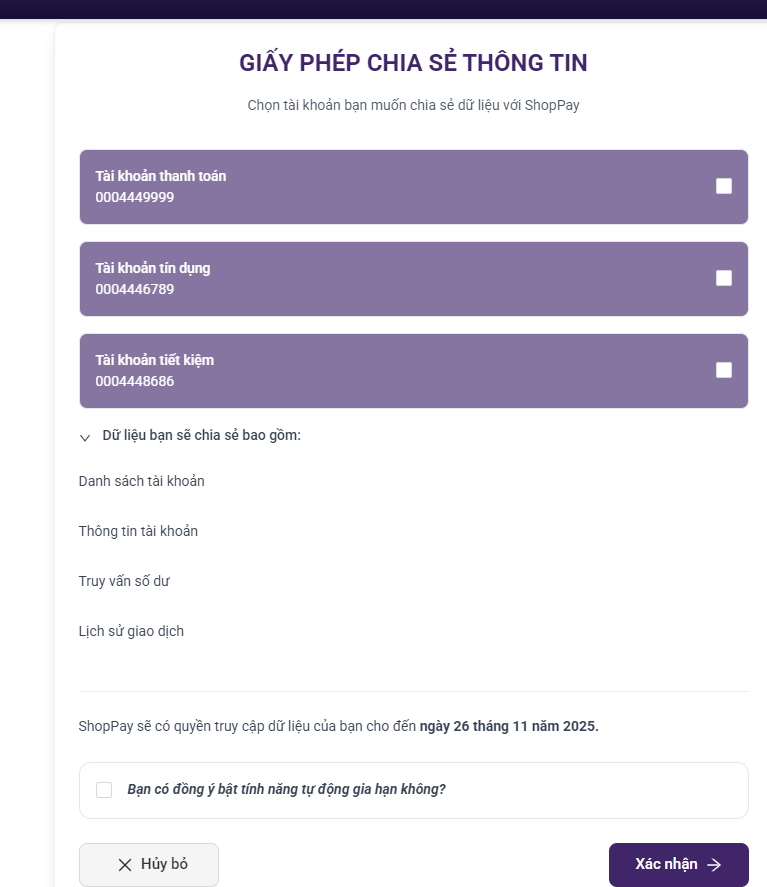
Step 5: The user views the requested data within the TPP application.
Step 6: The user reviews the transaction information within the Consent Session Management system

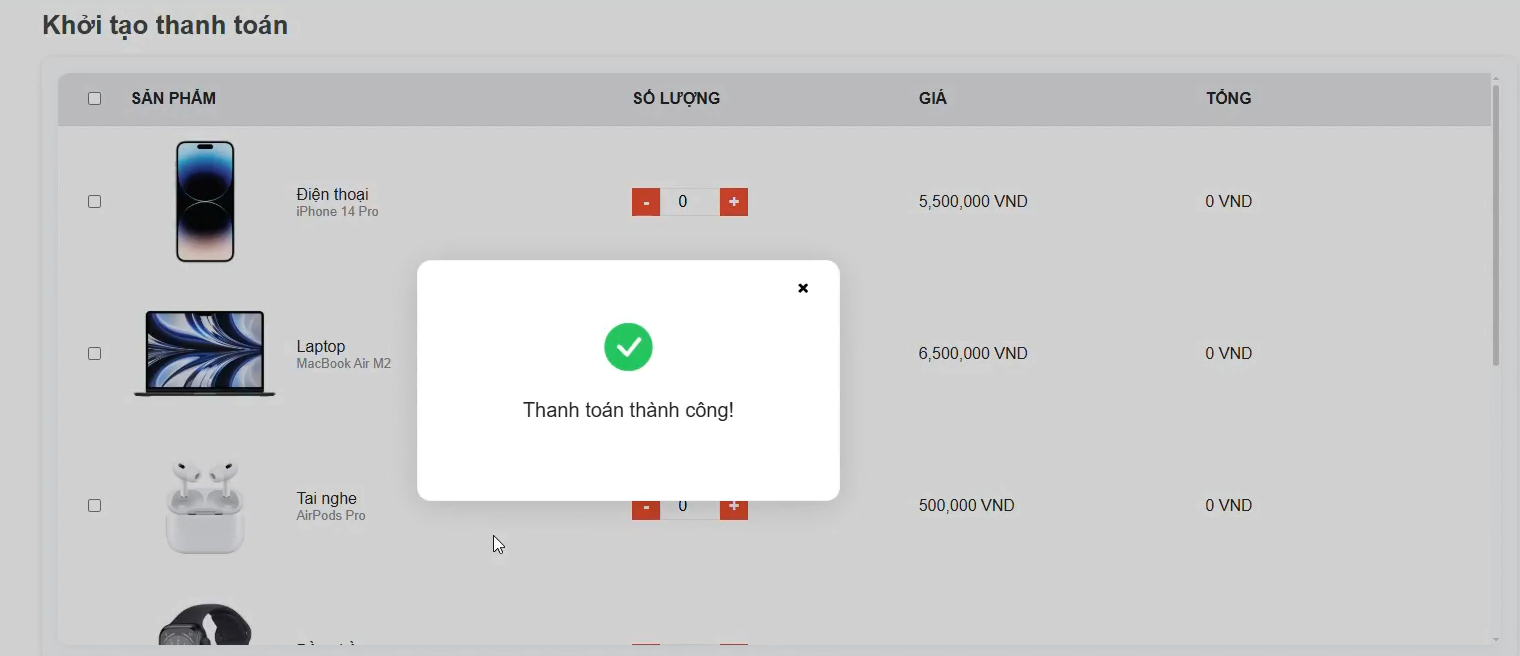
II.2. Decoupled Flow
Purpose: To describe the procedural steps for executing a purchase and payment transaction via the decoupled authentication flow.
Step 1: The user initiates a purchase within the TPP application, selects the bank, and confirms the payment
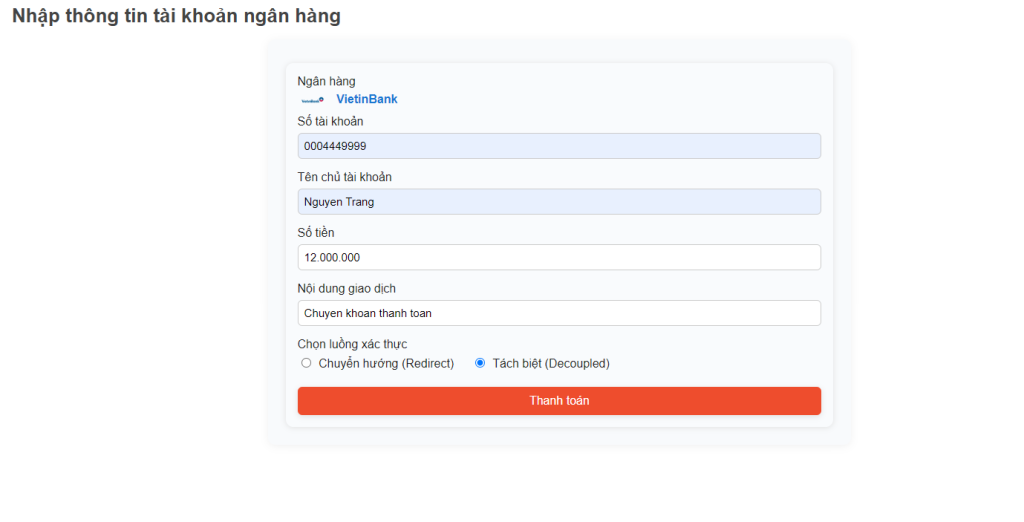

Step 2: The bank’s system transmits a notification requiring transaction authentication
Step 3: The user accesses the bank’s designated authentication application
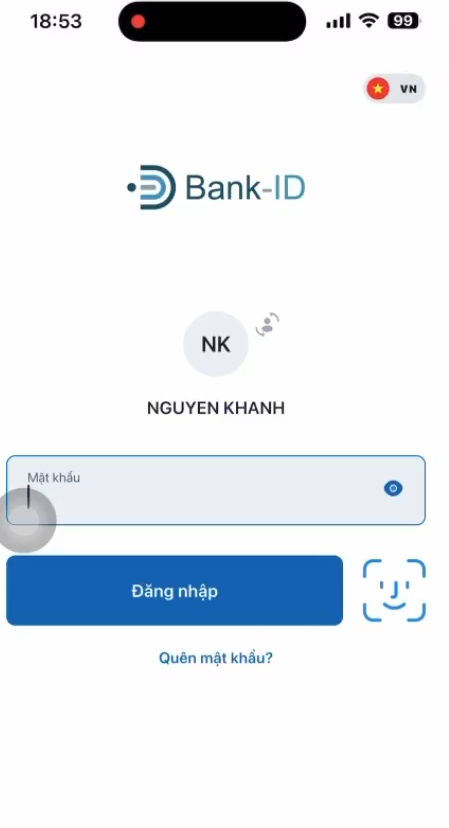
Step 4: The user confirms the transaction
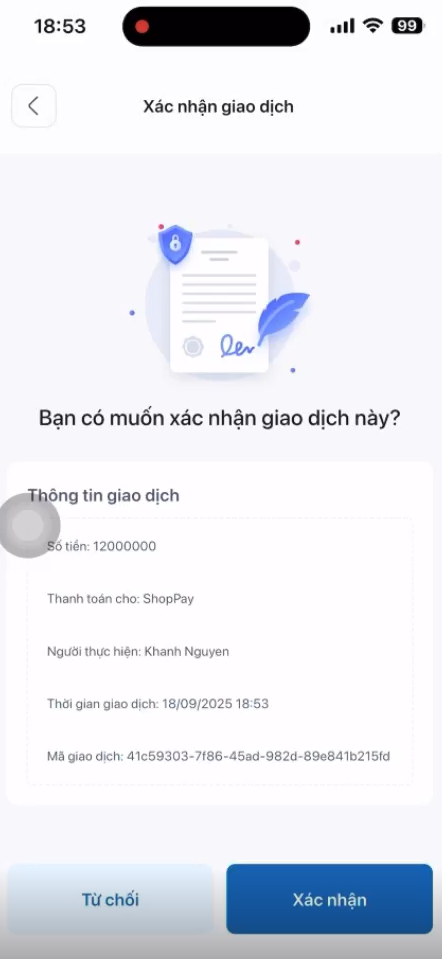
Step 5: The transaction is submitted, and a success confirmation is received
III. Consent Management
III.1. Login
Purpose: To enable users to authenticate and access the SCM system.
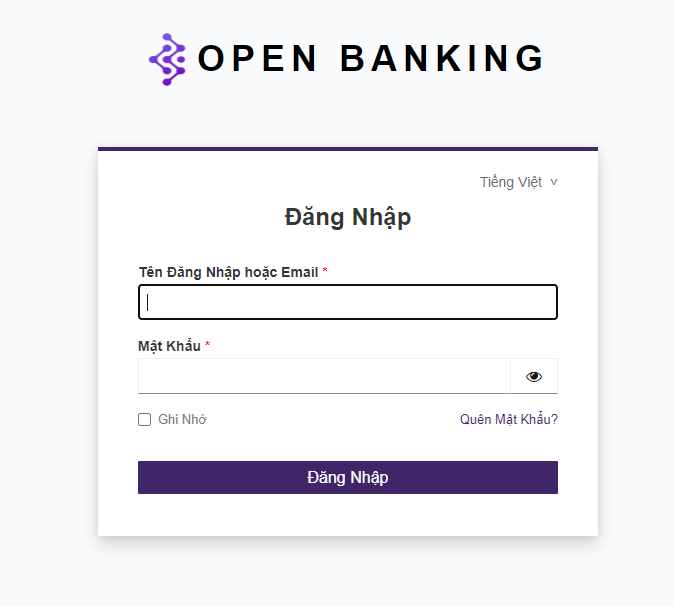
Step 1: Launch a web browser on a workstation and navigate to the following URL: https://ob-consent.savyint.com/login. The login interface will be displayed, facilitating system access

Step 2: Enter valid account credentials (username / password) to authenticate into the system. Upon successful authentication, the Dashboard will be the initial interface displayed
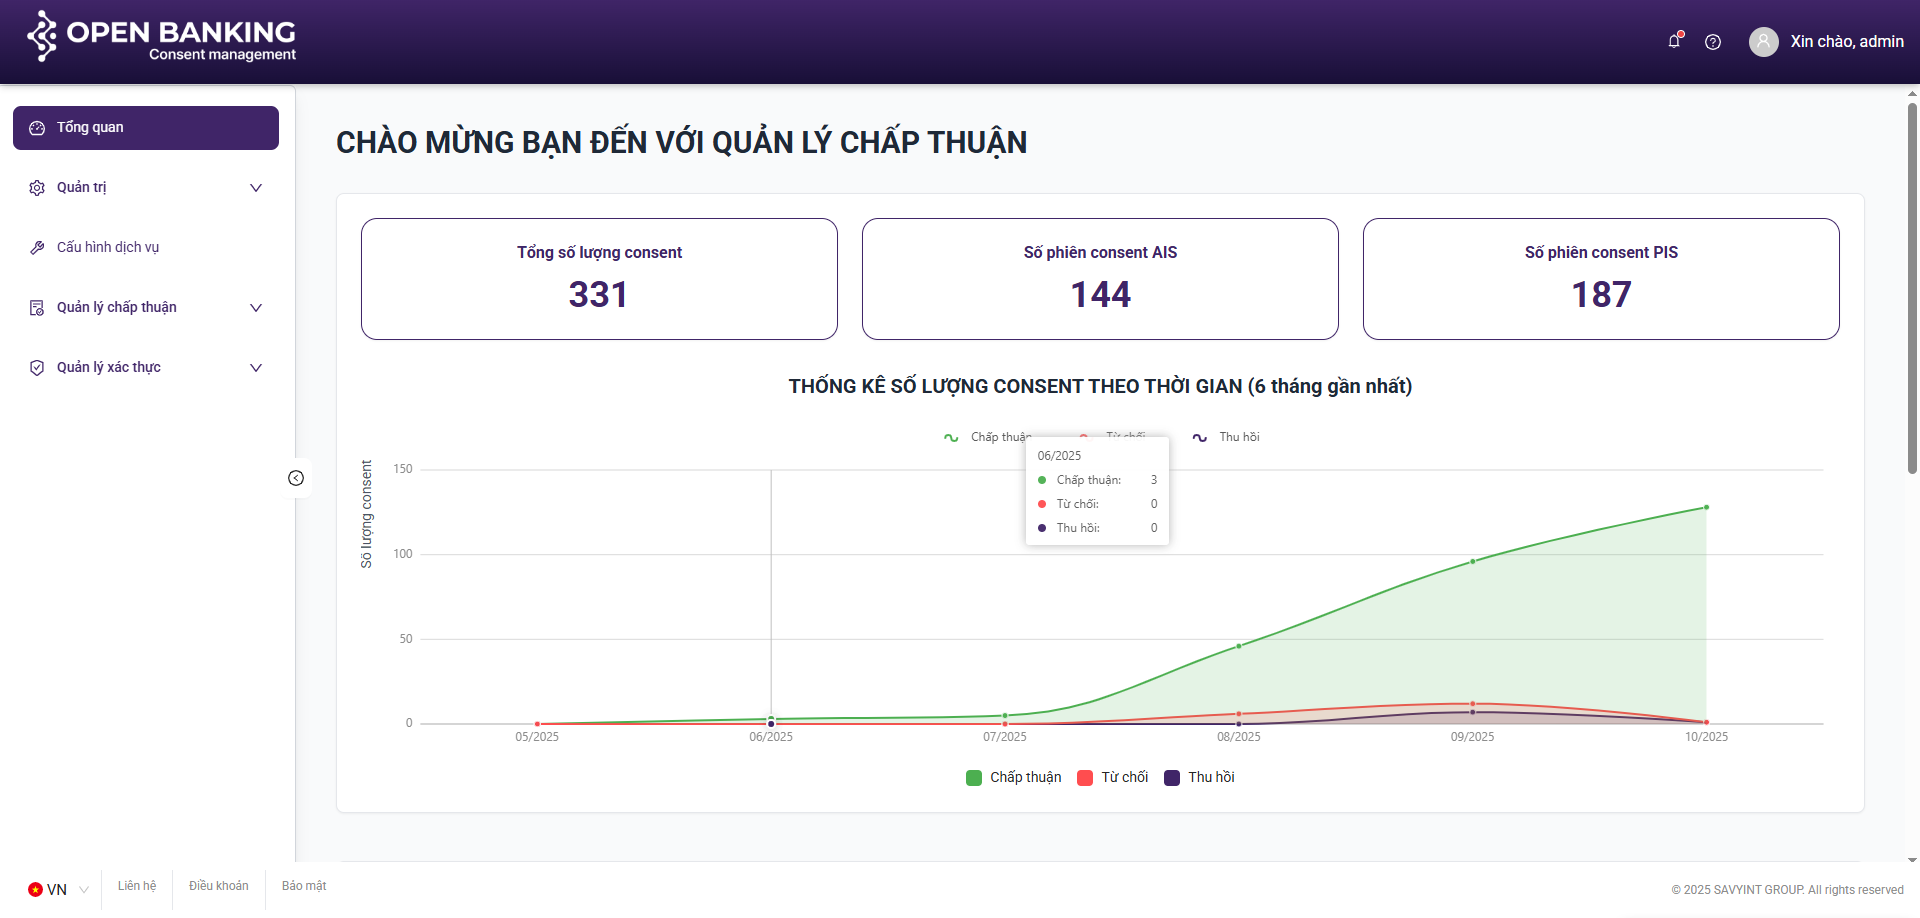
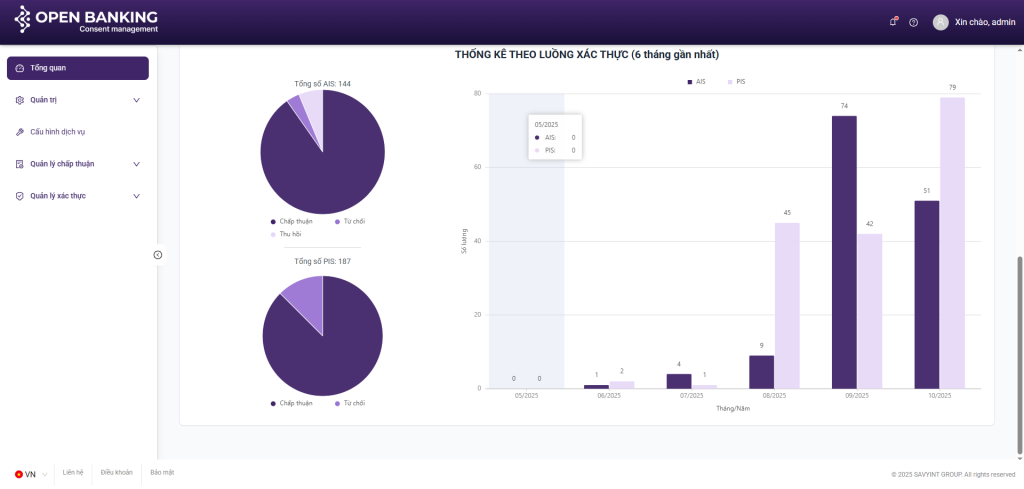
III.2. Dashboard
Purpose: To aggregate statistical data regarding consent sessions and visualize key metrics, providing an intuitive overview of the system status over the most recent six-month period
Components:
**Summary of key indicators:
- Total number of Consent Sessions
- Number of AIS Consent Sessions
- Number of PIS Consent Sessions
**Charts:
- Line Chart
- Pie Chart
- Bar Chart

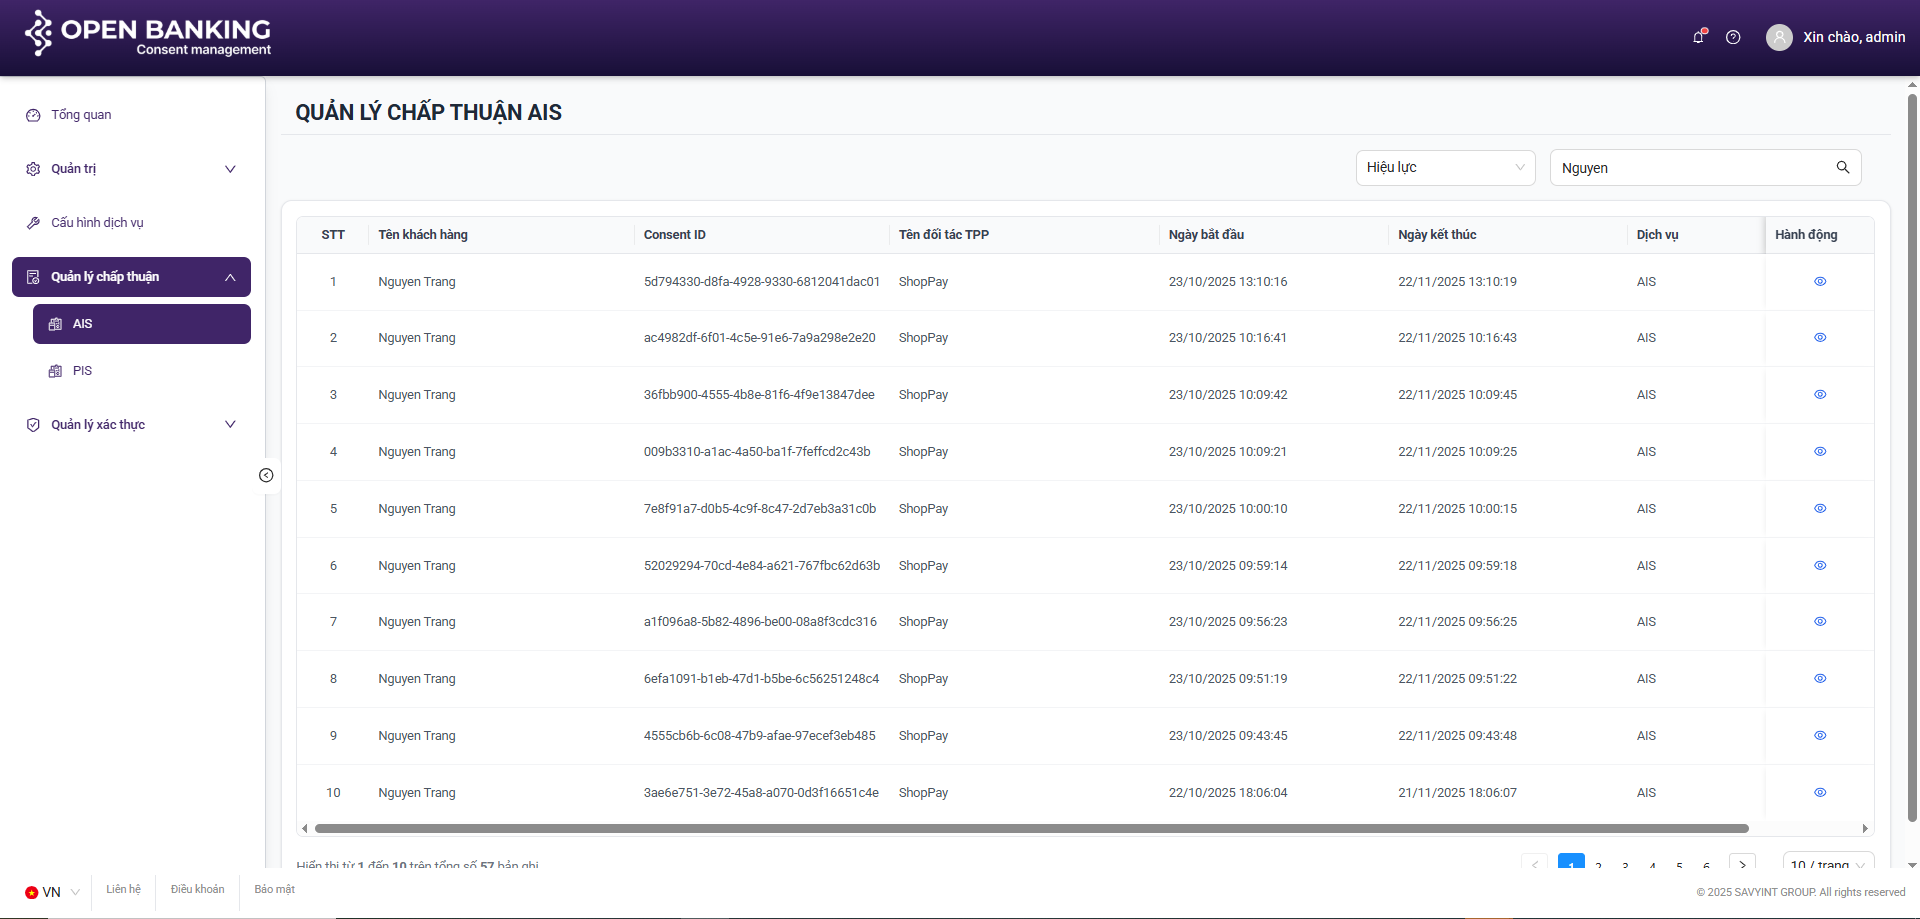
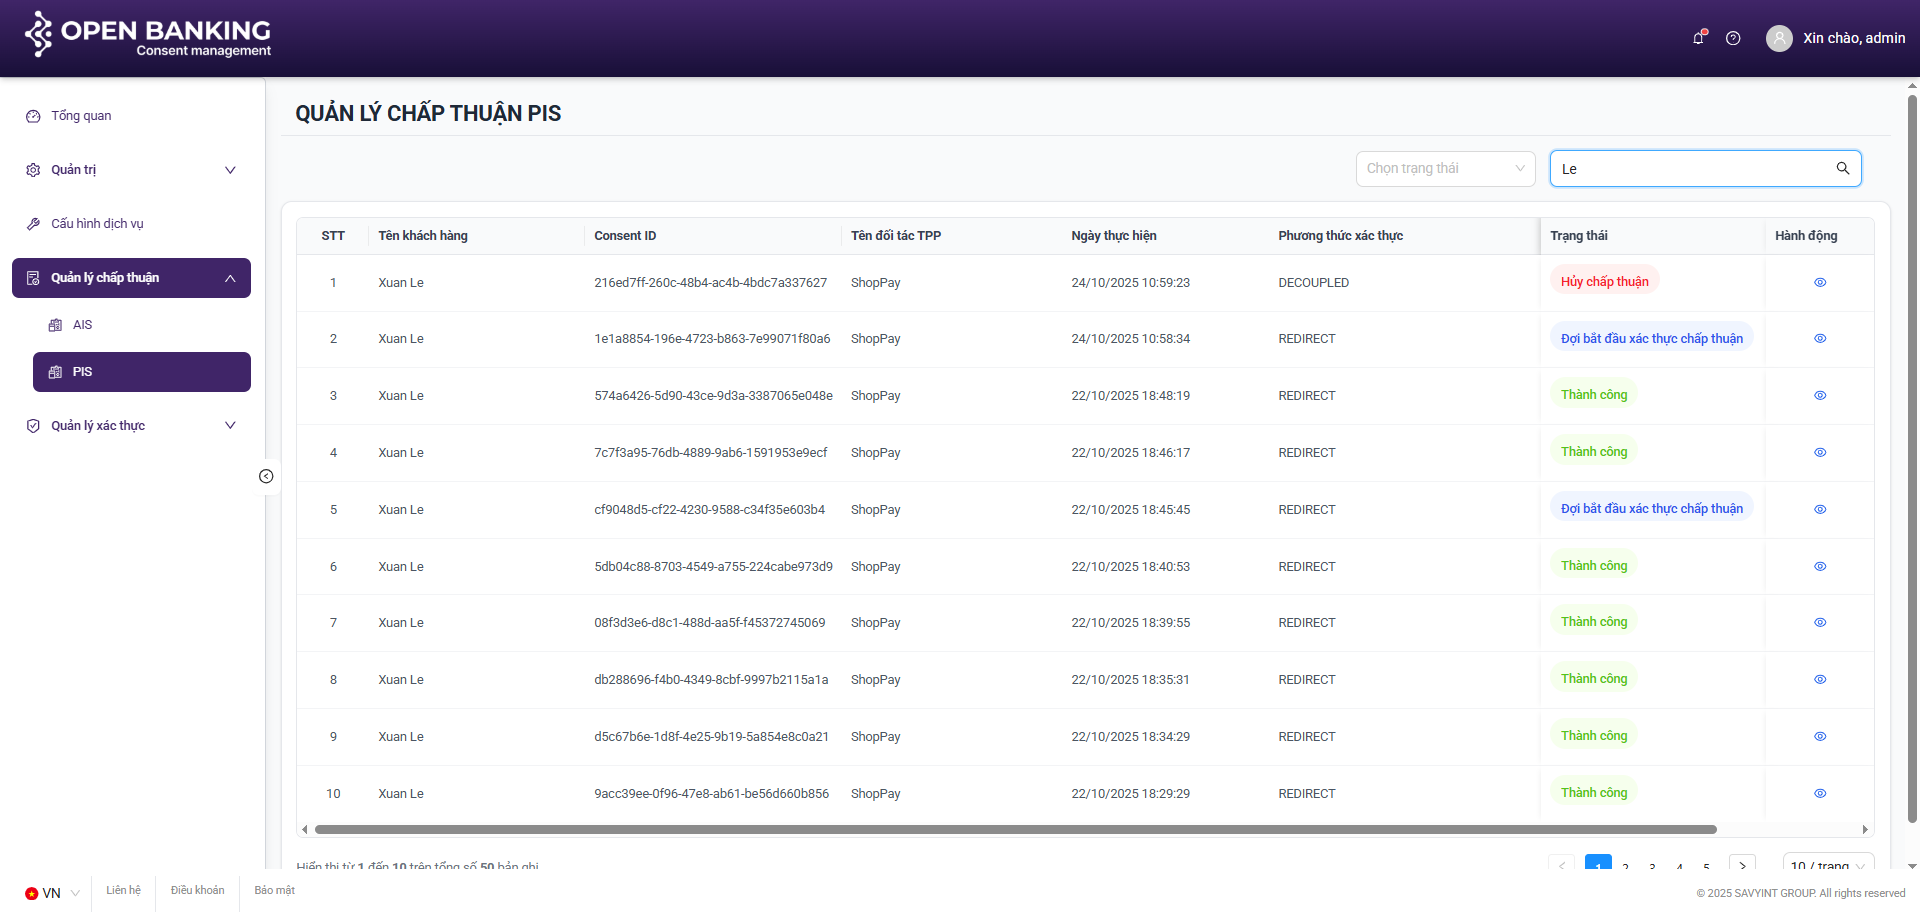
III.3. Consent Management
Purpose: To manage AIS and PIS consent sessions.
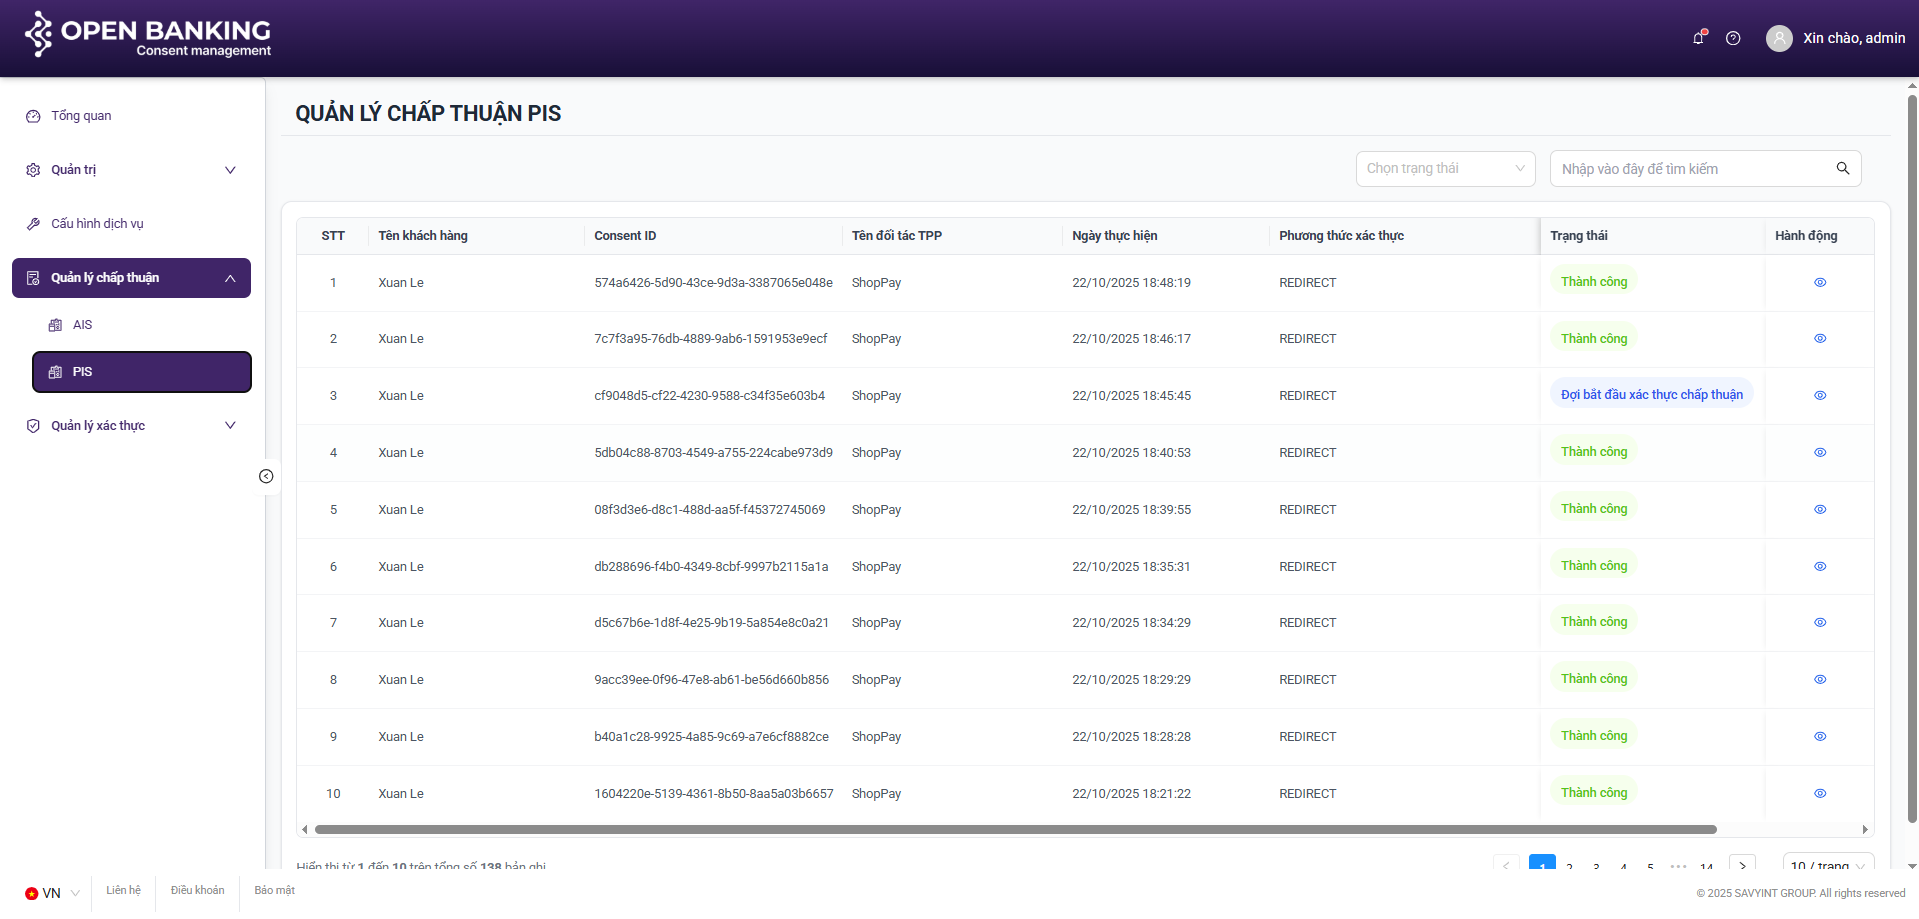
III.4. Functionalities
AIS Flow: Search / View Details / Revoke
III.4.1. Search
Step 1: Navigate to the consent management screen by clicking on the navigation tabs on the left side of the screen: Consent Management >> AIS / PIS
Step 2: On the AIS / PIS Consent Session list screen, enter the search keyword (Username) into the search bar or select a status from the status list >> Press “Enter” or to execute the user search
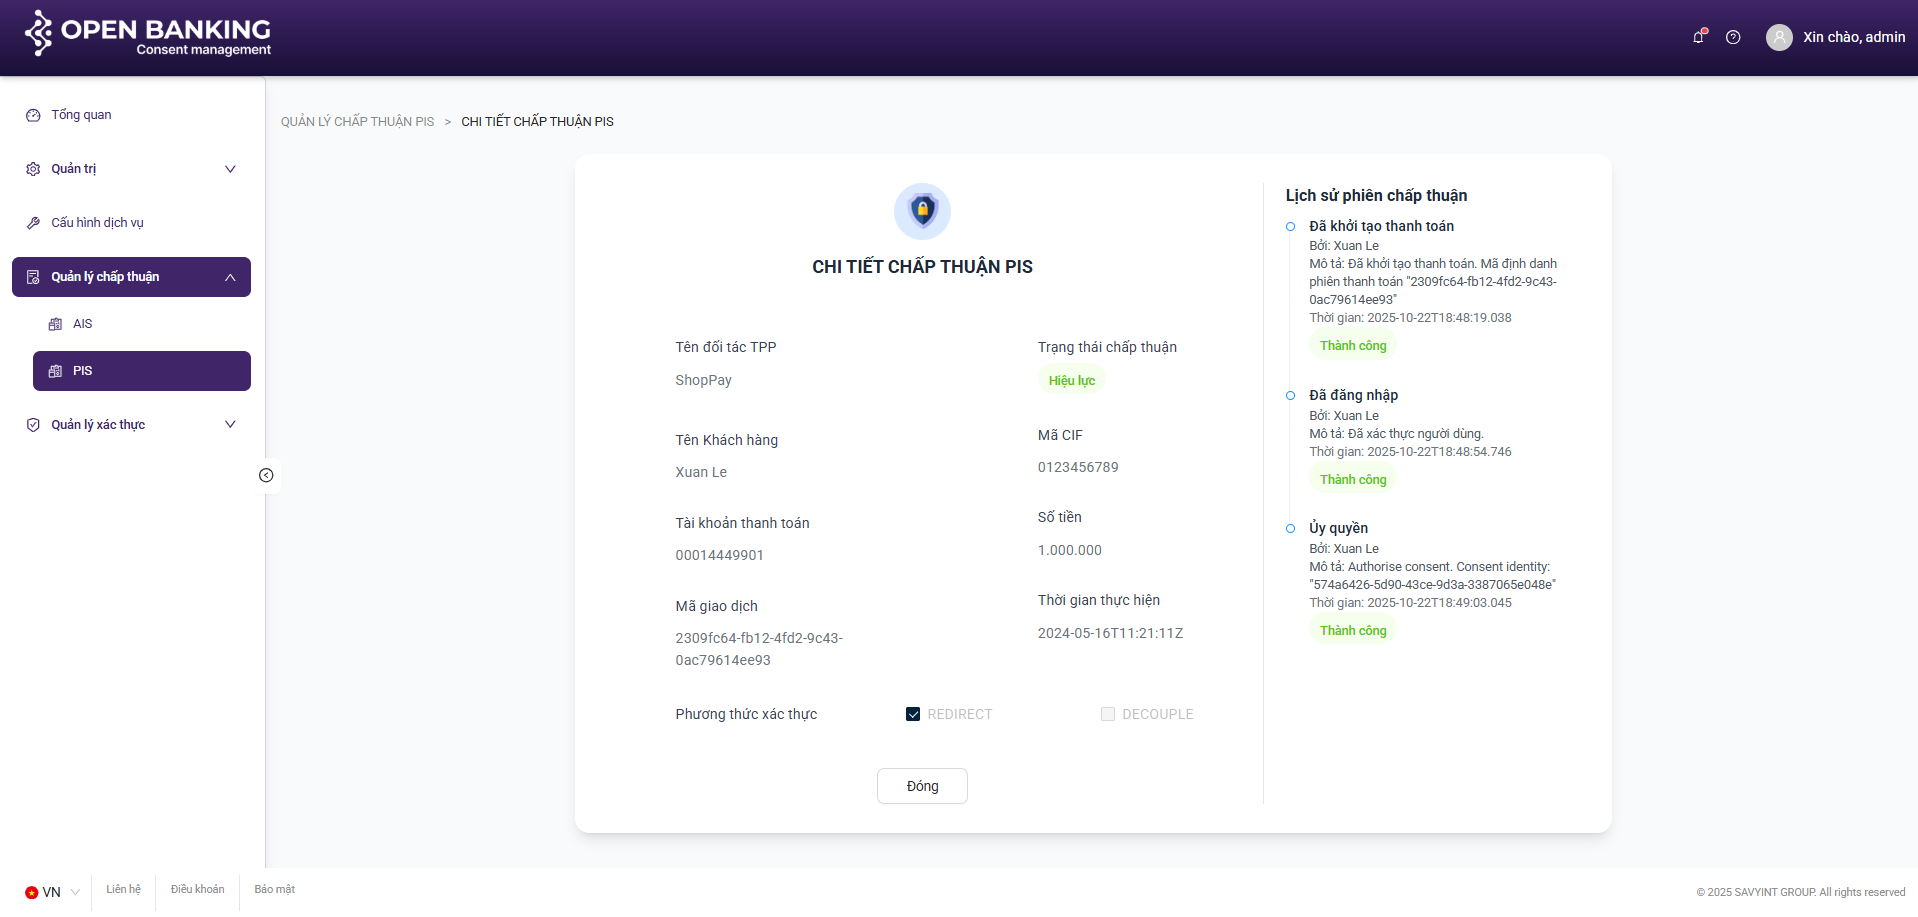
III.4.2. View Details
Step 1: Navigate to the consent management screen by clicking on the navigation tabs on the left side of the screen: consent management >> AIS / PIS.
Step 2: On the consent session list screen, select a specific consent session and click the “View Details” button
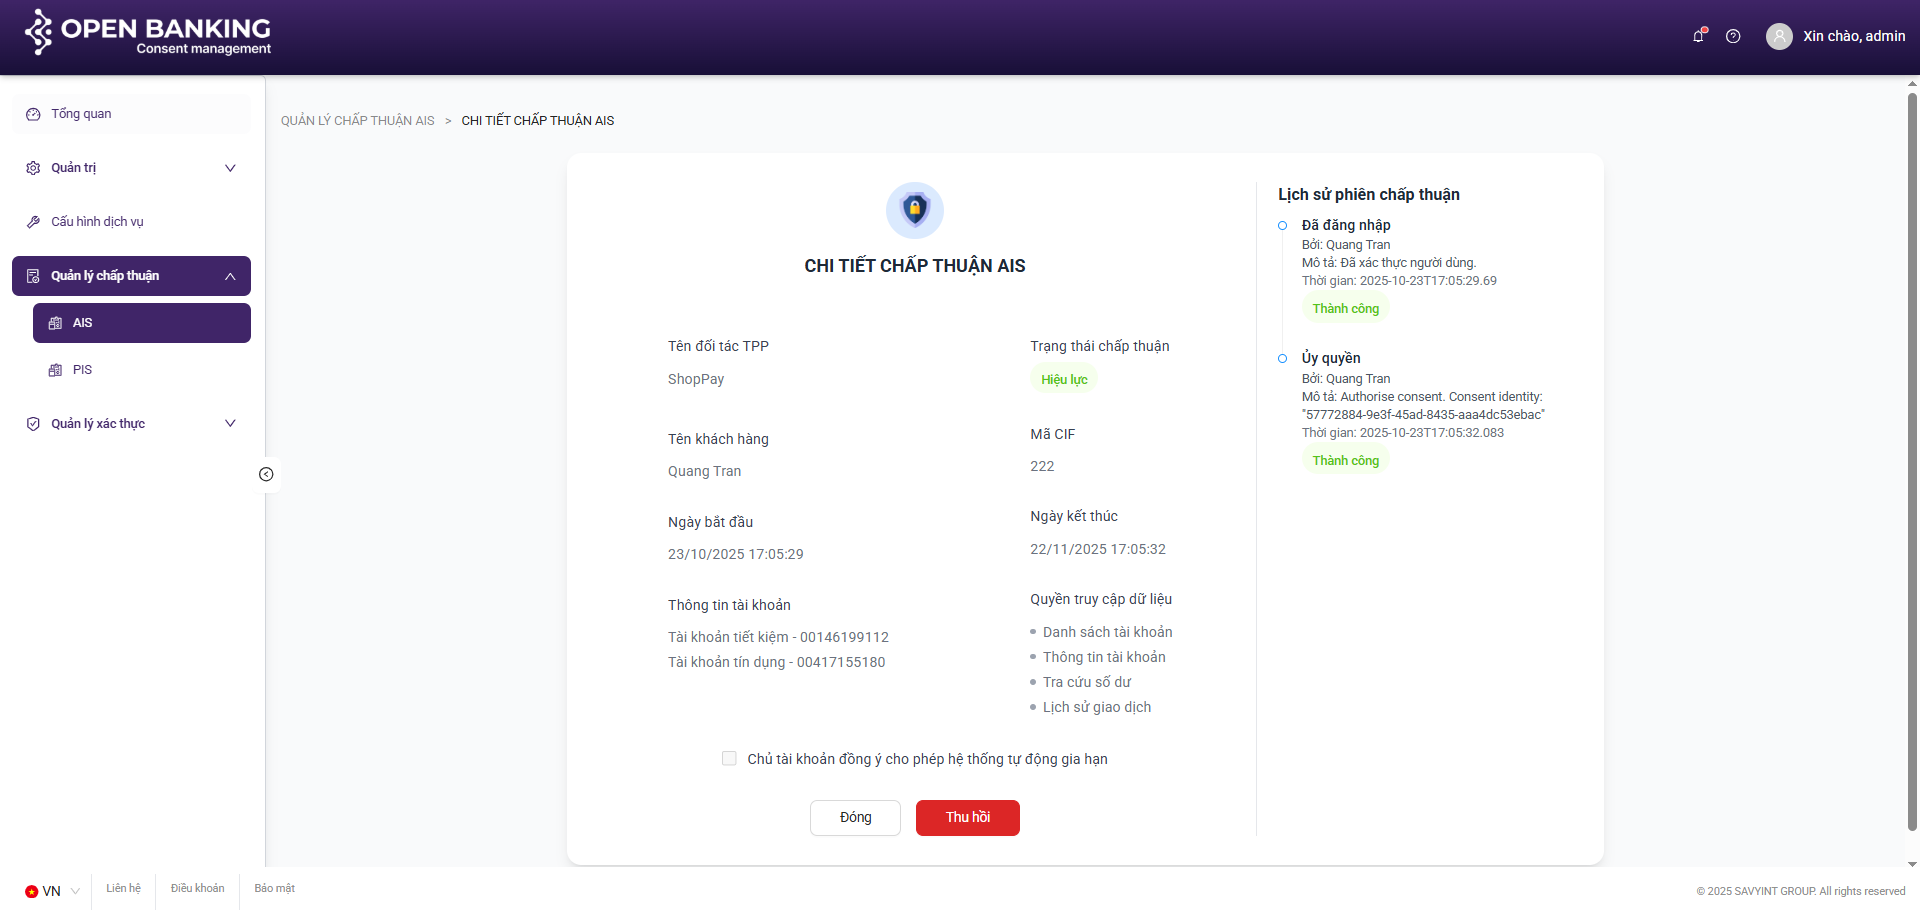
III.4.3. Revoke (AIS Only)
Step 1: Navigate to the consent management screen by clicking on the navigation tabs on the left side of the screen: consent management >> AIS
Step 2: On the Consent Session list screen, select a specific consent session and click the “View Details” button
Step 3: On the Detail View screen, click the “Revoke” button to terminate the content session

In this Article
I. Introductions
I.1. Purposes
The document “Savyint Consent Management (SCM) – Admin Guide” provides a detailed description and step-by-step instructions for administrators regarding the operation and utilization of the SCM product, covering the following key functions:
- Log In
- Dashboard
- User Management
- Role Management
- Action Logs
- System Configuration
- Consent Session Management (AIS, PIS)
- PIS Consent Authentication Management
II. Details
II.1. Login
Purpose:
- To enable users to authenticate and access the SCM system.
Step 1:
- Launch a web browser on your workstation and navigate to the URL: https://ob-consent.savyint.com/login
- The login interface will appear, enabling users to log in to the system
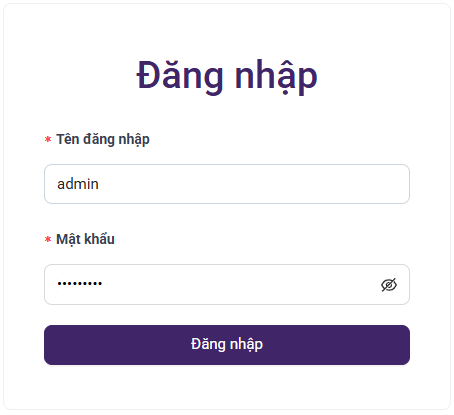
Step 2:
- Enter account credentials (username / password) to log in to the system
- Upon successful log in, the dashboard will display
II.2. Dashboard
Purpose:
- To aggregate statistical data regarding consent sessions and visualize key metrics, providing an intuitive overview of the system’s status over the past six months
Components:
** Summary of key indicators:
- Total Consent Sessions
- Total AIS Consent Sessions
- Total PIS Consent Sessions
** Charts:
- Line Chart
- Pie Chart
- Bar Chart

II.3. Dashboard
Purpose:
- To manage users within the system

Functions:
** List of Functions:
- View List of Users.
- Search / Create / Update / Remove User
- Active / Inactive User
More […]
In this Article
I. Introduction
The Consent Management System is a comprehensive technology solution that enables financial institutions and payment intermediary service providers to manage, store, and control customer consent during the process of accessing and sharing financial data.
The system supports enterprises in automating the collection, validation, and lifecycle management of consent in compliance with legal regulations, ensuring security, transparency, and full traceability.
I.1. Purpose
This document describes the Troubleshooting Guide for the operation of the Consent Management System, including:
- A list of common issues.
- Possible causes.
- Detailed remediation instructions for users and technicians.
The objective is to enable system stakeholders to rapidly identify and resolve issues, thereby ensuring the continuity and security of consent management operations.
I.2. Target Audience
End-users: May utilize this document for self-service reference and troubleshooting of issues encountered
Technicians / System Administrators: Utilize this document to diagnose, analyze, and remediate incidents within the system’s operational environment.
I.3. Scope of Application
This document applies to the Savyint Consent Management system and access to https://ob-consent.savyint.com/
II. Troubleshooting and Inspection Guide for End-Users
II.1. List of Potential Errors Encountered by End-Users
Error 1: Unable to access the system
- Probable Cause: Loss of Internet connection
- Resolution: Verify your network connection or refer to the “Clear Web Data” section
Error 2: Unable to log in to the system
- Probable Cause: Incorrect password
- Resolution: Verify your password or use the “Forgot Password” function to reset it.
Error 3: Not receiving notification emails
- Probable Cause: Incorrect email address during registration or email configuration issues
- Resolution: Refer to the “Email Verification” or “Notifications” section
Error 4: Business-related issues
- Probable Cause: Causes cannot be clearly identified
- Resolution: Contact the system operations support team via available channels such as phone, email, or ticketing system
III. Troubleshooting and Inspection Guide for Administrators
III.1. List of Potential Errors Encountered by End-Users
Error 1: Unable to update system configuration
- Probable Cause: Roles and permissions have not been established or assigned to the user or administrative account
- Resolution: Review and assign the appropriate roles and permissions to the user account
Error 2: Unable to access the consent management system
- Probable Cause: Unexpected system downtime caused by service shutdowns or connectivity issues
Error 2 – Resolution:
Step 1: From the server accessing the consent management system, perform a telnet command to the consent service
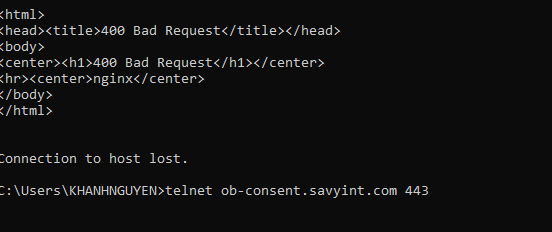
Step 2: If the service is deployed on K8s or OpenShift environment, check the status of the pods
Step 3: Invoke the Consent Service Health Check API to verify the current status of the system
curl –location ‘http://ob-consent.savyint.com/healthcheck/service’ \
–header ‘Content-Type: application/json’
Step 4: If the service appears operational but remains inaccessible from external points, verify network connectivity between zones.

If the issue is network-related, ensure connections between network zones are opened to restore access
Step 5: If the service has been shut down, restart the service and review system logs to identify the cause of the shutdown
Step 6: Inspect the system database to ensure storage capacity is not full and check for any anomalous errors
Error 3: Unable to access the consent management system
- Probable Cause: Unexpected system downtime caused by service shutdowns or connectivity issues
- Resolution: Access the administration system and review the transaction session details
Error 4: Unable to push logs to the centralized logging system
- Probable Cause: Configuration error regarding log forwarding to the ELK stack, or network connectivity has not been established between systems
- Resolution: Review the ELK log configuration and verify network connectivity
III.2. Additional Issues and Resolutions
Error 1: Clearing web data (Clear Web Data)
During system usage, the browser stores temporary data (such as cookies, sessions, and local storage) to maintain login states and user authentication for the consent management system.
However, this data may become corrupted due to:
- Sudden disconnection during authentication request
- Conflicts with data from other websites under the same domain
- Browser crashes or malware infection
- Cache issues after system upgrades or deployment of new versions
When users experience anomalies such as:
- Inability to interact with the “Confirm Consent” button
- The interface freezes or becomes unresponsive
- Failure to display the authentication form or OTP
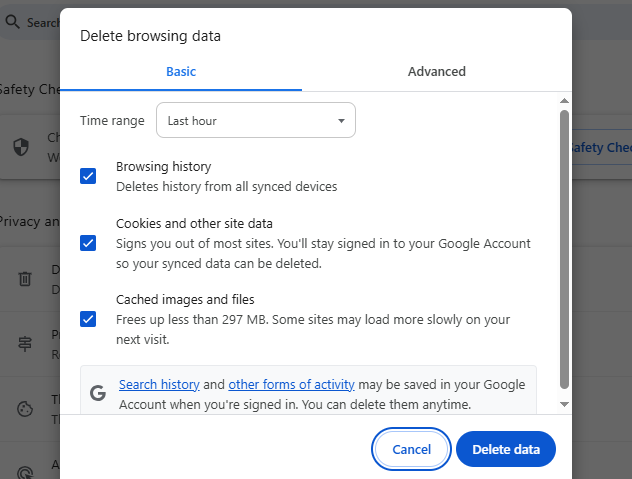
Method 1: While accessing the system, press the key combination Ctrl + Shift + Del. Select the desired “Time range” and click “Delete data”
Method 2: While the system interface is open, press F12 or right-click → Inspect”. Within the DevTools window → navigate to the Application tab → select Storage from the left-hand menu → click “Clear site data”. Subsequently, reload the page and log in again to resume system usage.
Error 2: Checking Internet connectivity
The Consent Management System operates online and depends on a stable network connection to perform the following functions: sending and receiving authentication requests to/from the server or PIS/AIS partners; obtaining access tokens within their valid lifecycle (example: PIS tokens with a maximum validity of 300 seconds); sending consent confirmation or revocation notifications to users.
Error 2 – Resolutions
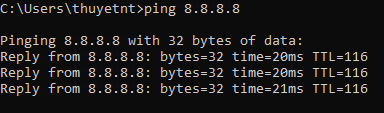
Step 1: Open CMD and run the command ping 8.8.8.8. If the response time is <100 ms, the connection is considered normal.
Step 2: Attempt to access another website (example: https://google.com) to verify that the Internet connection is functioning properly
Step 3: Check network cables, connection ports, or Wi-Fi status.
Step 4: Contact your Internet Service Provider (ISP) if the connection is unstable.
Step 5: If the issue is localized to a specific device (e.g., computer or network adapter), contact IT technical support to inspect hardware and security software.
Step 1: Open CMD and run the command ping 8.8.8.8. If the response time is <100 ms, the connection is considered normal.
IV. Savyint Contact
If users are unable to resolve the issue using the guidance in this document, please contact the SAVYINT Technical Support Team for direct assistance.
Support Channels:
- Email:
- Phone: +84 243 782 2345
- Instant support chat (Telegram):
Information to Provide When Requesting Support
- To assist the technical team in diagnosing and resolving the issue efficiently, please include the following details in your support request:
Detailed description of the issue:
- The specific operation during which the error occurred (example: creating new consent, signing/confirmation, revocation, OTP authentication, etc.).
- Relevant API of the Consent Management System involved (if applicable).
- Screenshots of the error.
- Timestamp of the error occurrence.
In this Article
Not finding documentation you need?